Friday, October 31, 2014

Healthy Thanksgiving Recipes

I love Thanksgiving, but I don't like having to only have one bite of this and one bite of that because the fat content is so high.  So I have come up with a few alternatives that are now part of the family tradition.  If you love mashed potatoes try whipped cauliflower.  Don't by canned cranberries, make them yourself (super easy and taste so much better)
Best part of these side dishes, I can have a grown up portion instead of one tiny bite. 

 
Whipped Cauliflower


Ingredients

1 medium head cauliflower
1 tablespoon cream cheese, softened
1/4 cup grated Parmesan
1/2 teaspoon minced garlic
1/8 teaspoon straight chicken base or bullion (may substitute 1/2 teaspoon salt)
1/8 teaspoon freshly ground black pepper
1/2 teaspoon chopped fresh or dry chives, for garnish
3 tablespoons unsalted butter


Directions

Set a stockpot of water to boil over high heat.

Clean and cut cauliflower into small pieces. Cook in boiling water for about 6 minutes, or until well done. 
Drain well; do not let cool and pat cooked cauliflower very dry between several layers of paper towels.

In a bowl with an immersion blender, or in a food processor, puree the hot cauliflower with the cream cheese, Parmesan, garlic, chicken base, and pepper until almost smooth.

Garnish with chives, and serve hot with spray butter.

Hint: Try roasting the garlic and adding a little fresh rosemary for a whole new taste.

Chef: George Stella

Recipe courtesy George Stella

Read more at: http://www.foodnetwork.com/recipes/mock-garlic-mashed-potatoes-recipe.html?oc=linkback


Orange-Cranberry Sauce
 

Ingredients
3/4 c sugar 
2 oranges, zest and fruit, discard pith and membrane 
2 c cranberries, fresh or frozen 
1/4 t cinnamon, ground 
pinch cloves, ground

Directions 
Remove the zest from the two oranges using a zester or a small knife. 
Place the zest, sugar, and 3/4 cup of water into a saucepan. 
Bring to a simmer and cook for 5 minutes. 
Add cranberries and continue to cook until the cranberries start to pop, about 2 minutes. 
Add the oranges and spices to the mixture. 
Stir until mixture is combined. 
Serve hot or cold. 

Tip
If you like you cranberry sauce more like jelly, transfer entire mixture to the bowl of a food processor.   
Great on oatmeal, Greek yogurt, spread on your turkey sandwich 
Fat free chicken dinner by placing in crock-pot with chicken, Lipton onion soup mix, & fat free Catalina dressing and cook till tender.


Roasted Squash Soup 
Studies have shown that starting a meal with a broth-based soup can fill you up, so you eat fewer calories over the course of a meal. This soup gets a boost of flavor from cilantro pesto, but there's very little fat in this version. TIP: Roast the squash ahead of time and freeze it. Your oven will be full on Thanksgiving, and this will save you some valuable time.

Ingredients 
Soup 
1 T olive oil 
1 c onions, chopped fine 
1 large butternut squash, approx. 3 lbs 
4 c low sodium chicken stock  
1 orange 
1/2 c orange juice
Garnish 
1/2 bunch cilantro, fresh, leaf only
1/4 c unsweetened coconut, flake 
1 orange (zest, juice, and fruit) 
1 Serrano chili pepper
Directions 
Preheat oven to 375 degrees. Peel, halve, and remove the seeds from the squash. Dice into 3/4 inch cubes. Spray a roasting pan with nonstick cooking spray, add cubed squash, and spray the top of the squash. Roast 20-25 minutes or until squash is tender. Remove from oven. Place oil in a dutch oven or medium size saucepan. Sauté the onion in the oil over moderately low heat, stirring, until it is softened. Add the squash and stock; cook the mixture, covered, over moderately low heat for 10 minutes. Add the orange zest and the juice; simmer the mixture, uncovered, for 10 minutes. Using a blender or food processor, purée the mixture in batches. (For a smoother texture, strain the soup through a sieve, but you'll remove some of the fiber.) In a blender or food processor, blend the coconut, hot pepper, cilantro, orange juice and flesh until mixture forms a puree. If mixture is too thick, add warm water to thin it. Ladle the soup into soup cups and garnish each serving with about a teaspoon of the pesto.
Makes 8 one cup servings.
     

Tuesday, October 14, 2014

Training for the Run - Tie Your Shoes

How to Properly Tie Your Running Shoes

Here are five ways to lace your running shoes and relieve that nagging foot pain.


You went to a running specialty store, tested out several models, and bought a pair that felt great. So why are your new running shoes rubbing you the wrong way? Even if you are fitted with a pair that suits your arch type and weekly mileage, your feet may have characteristics that make the seemingly perfect shoe less than comfortable over the long haul. Luckily, the solution could be as easy as relacing your shoes, says Richard Bouché, D.P.M., of the Sports Medicine Clinic in Seattle, who provided the techniques below. "Before you get a new shoe, try adjusting the lacing to enhance the fit," Bouché says. "It's a small change that can make a big difference."


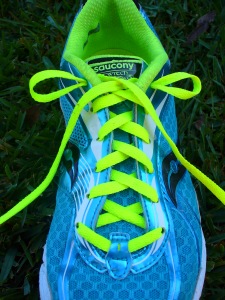
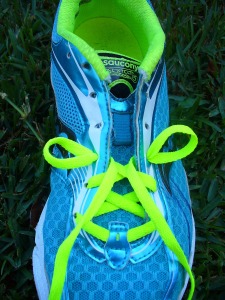
First, let’s cover the LOOP LACING LOCK. This technique can be used in a number of different lacing patterns to insure a tight and snug fit anywhere along the eye row of your shoe, depending on where your laces seem to be slipping.
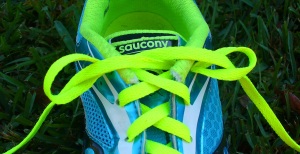
In this example, I have put the loop lacing lock at the top of the shoe. The shoe was cross-laced as usual to the top of the shoe. To accomplish the loop lacing lock, put each lace end back into the same hole it just exited, leaving a small loop on each side.


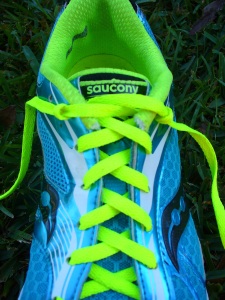
 Then thread each loose end through the loop on the opposite side of the shoe.

 Pull tight to make loops smaller. Then tie shoe as usual.


PROBLEM: My big toenail turns black


Solution: 
Lift the upper material above your big toe up and off it.


Technique:
To accomplish this threading technique, start by threading one end of the shoe lace through the eyelet at the top of the shoe on the opposite side of your big toe. Leave enough lace length to tie the shoe. Lace the rest of the shoe lace through the eyelet closest to your big toe, creating a diagonal lace down the length of the shoe. Lace this long length of shoe lace straight across toward the outside of the shoe and then diagonally up toward the inside of the shoe. Repeat this lacing pattern until the shoe is laced to the top. Tie the shoe, as usual. Lacing the shoe this way allows the material above your big toe to be pulled up and off of the nail when the outside lace is tugged and tied tightly.


PROBLEM: My shoe is too tight along the top of my foot
 
Solution: 
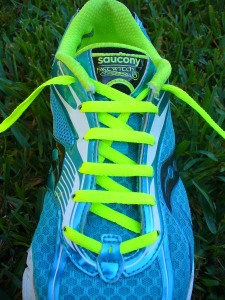
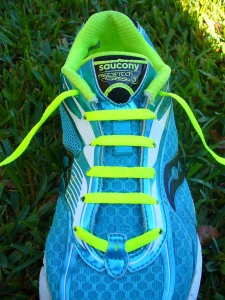
Use parallel lacing to secure your foot without putting pressure on the top.

Technique:
To give your shoe an overall roomier feel, try the parallel lacing technique. To start, lace the first tow eyelets near the toe of the shoe. On one side, pull the lace up through the first eyelet and then straight across the shoe and into the eyelet directly across from it. On the other side, skip the first eyelet and pull the lace up through the second eyelet and then lace it into the eyelet straight across from it. Repeat this skipping an eyelet and lacing across pattern until the shoe is laced to the top. 


PROBLEM: My heel slips up and down

 
Solution: 
Create a more secure fit around the ankle without tightening the entire shoe.

Technique: 
Lace as normal until one eyelet remains on each side. Draw the lace straight up on the outside of the shoe and bring it through the last eyelet. This will create a loop. Repeat on the other side. Cross each lace over the tongue, thread it through the opposite loop, and tie. The loops help to cinch in the material around your ankle to prevent your heel from slipping without making the rest of your shoe any tighter.


 PROBLEM: High Instep

 Technique:
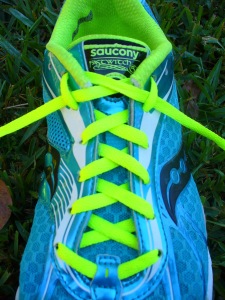
Near the toe of the shoe, start lacing with the cross-lacing technique. Once you get to the middle of the shoe, thread the laces up the sides of the eye row, leaving room. Continue cross-lacing at the top of the shoe and tie at the top as usual. This will give your foot room in the midfoot area and help keep the shoe from feeling to tight across the arch of the foot.


PROBLEM: Wide Forefoot


 Technique:
From the bottom of the eye row, lace up the sides of the shoe. Once you get to the middle of the shoe (midfoot), start the cross-lacing technique and continue on to the top of the shoe. Tie shoe at the top, as usual. This will give your foot plenty of room to spread or allow your toes to splay while running.


PROBLEM: Narrow Foot


  Technique:
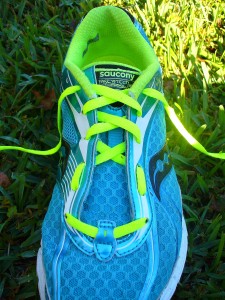
To help a shoe fit more snugly on a narrow foot, you might want to try adding a loop lacing lock in the middle of the eye row. To accomplish this, cross-lace the shoe as normal up to the midfoot, add a loop lacing lock, and then continue cross-lacing the shoe to the top. Tie the shoe at the top, as usual. Doing this will double the amount of laces across your midfoot, ensuring a snug fit.


PROBLEM: Heel Slipping


Technique:
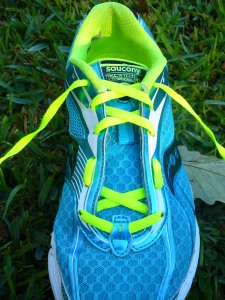
There are two good ways of keeping a shoe from slipping on the heel. The first way is to put a loop lacing lock at the top of the shoe (shown in the beginning of the post) and tie shoe as usual. Another way is to use a modified loop lacing lock, called a “runner’s tie.” To accomplish the runner’s tie, cross-lace the shoe until the second to last top hole and then lace up each side of the eye row. Take each loose lace end and thread it back under the side lace of the opposite side. Tie the shoe at the top, as usual.


PROBLEM: "MY SHOE RUBS ONE SPOT ON THE TOP OF MY FOOT." Solution: Eliminate pressure on a "hot spot" by lacing around it, not directly over it.

Technique:
Place a lipstick smear on your hot spot. Slide your bare foot into your shoe and take it out. The mark on the underside of the tongue tells you which set(s) of eyelets to skip. Lace your shoe until you reach the eyelet before the spot. Take the lace back under and pull it up through the next eyelet on the same side. Take the lace across and continue to lace. Repeat this on the other side. You'll have an empty spot on the tongue where no laces cross it, which should eliminate your pressure point.

Wednesday, October 1, 2014

30 Day Plank Challenge


Take up this 30 day plank challenge this month and tone up and boost your core muscles to the max.
The plank challenge is our most popular 30 day fitness challenge and has been taken by over 100,000 people over the past 12 months, so why not give it ago for yourself.
The challenge only has 1 exercise which you have to do each day, and the time spent doing the exercise slowly increases day by day to help you build up your core body muscle strength gradually, ensuring you are able to complete the final day of the challenge easily.


You only have to do the amount of time shown on the challenge chart once per day, however if you are feeling brave then you can repeat each days challenge as many times as you like – however remember by day 30 it will be very hard to do multiple times.

for more on the 30 DAY FITNESS CHALLENGES