Friday, November 14, 2014

21 Healthy Thanksgiving Ingredient Substitutions


The holidays are coming and they're typically full of rich and highly caloric foods that aren't necessarily good for our health or our waist lines. The average American gains approximately one to two pounds during the holidays. These pounds typically aren't shed and can add up over the years.

This holiday season, stop the cycle.

By making just a few minor adjustments, you can save yourself hundreds of calories. Use some of the tips below to reduce calories and fat while preserving the flavor of your meals.

HIGH CALORIE INGREDIENT SUBSTITUTIONS

1. Baked Goods
Oils and butter in these recipes can be substituted with apple sauce, prune puree, or bananas.

2. Chocolate
Use fewer chocolate chips than a recipe calls for or substitute with cocoa powder.

3. Whole Milk, Whipping Cream
Lower fat milk or imitation whipped cream will reduce your calories greatly.

4. Butter
Use healthier fats like light cooking spray, whipped butter, olive oil, peanut oil, or a trans-fat-free margarine.

5. Salad Dressing
Salads may seem super healthy, but just a tablespoon of some salad dressings can set you back 100 calories. Instead use reduced-calorie salad dressing, lemon juice, reduced-fat cottage cheese, or herb-flavored or wine vinegar.

6. Cheese
Instead of the usual cheese, try reduced fat cheese. I bet neither you nor your family will be able to tell the difference.

7. Sour Cream, Mayonnaise
Use a plain fat free Greek yogurt--it has the same texture and similar flavor to both sour cream and mayonnaise.

8. Gravy
Put your gravy into the refrigerator before serving. Once it gets cold the fat will collect at the top, skim it off, defrost, and serve.


DINNER TIME

9. What to Serve
Serve low calorie foods like Canadian bacon, roast beef, raw vegetables, light cheese, dip made with fat free yogurt, and/or homemade salsa.

10. Lean Your Meats
Make your meats lean by removing the skin and fat before eating.

11. A Full Plate
Fill up half of your plate with non-starchy vegetables like salad, green beans, spinach, or broccoli.

12. Portion Control
If you have trouble with portion control, drink two large glasses of water right before you start your meal and continue to take sips between bites.   Remember, the kitchen doesn't close the moment you leave it, so take smaller portions, and if your really hungry afterwards you can go get more.  


13. Get Involved
Get involved in the table conversation.  Your plate will stay full longer because your eating slower and your brain has time to register that your stomach is satisfied. 
 

DESSERT TIME

14. Low-Calorie Sweets
Make a lower-calorie dessert like Angel food cake topped with light whip cream and fruit.

15. Fruits

Poached or baked fruits with a light whipped topping also make great desserts.

16. Cakes and Pies
Gingerbread is a lower calorie alternative to the usual cakes and pies.

DRINKS

17. Add Water
Make spritzers with sparkling water or club soda and add some fruit for flavor.

18. Low Calorie Options
Choose light beer, wine, or drinks made with no calorie mixers.

19. Alternate
Alternate between alcoholic drink and water to stay hydrated and keep calories lower.

20. Infusion
Try an infused liquor to reduce alcohol intake and use of mixers.

AFTER MEAL ACTIVITY

21. Walk it Off
Make activity a habit after your meals--whether it be a walk or an interactive game, get the whole family involved so that you can all burn a few extra calories and lead a longer, healthier life togethe

Friday, October 31, 2014

Healthy Thanksgiving Recipes

I love Thanksgiving, but I don't like having to only have one bite of this and one bite of that because the fat content is so high.  So I have come up with a few alternatives that are now part of the family tradition.  If you love mashed potatoes try whipped cauliflower.  Don't by canned cranberries, make them yourself (super easy and taste so much better). 
Best part of these side dishes, I can have a grown up portion instead of one tiny bite. 

 
Whipped Cauliflower


Ingredients

1 medium head cauliflower
1 tablespoon cream cheese, softened
1/4 cup grated Parmesan
1/2 teaspoon minced garlic
1/8 teaspoon straight chicken base or bullion (may substitute 1/2 teaspoon salt)
1/8 teaspoon freshly ground black pepper
1/2 teaspoon chopped fresh or dry chives, for garnish
3 tablespoons unsalted butter


Directions

Set a stockpot of water to boil over high heat.

Clean and cut cauliflower into small pieces. Cook in boiling water for about 6 minutes, or until well done. 
Drain well; do not let cool and pat cooked cauliflower very dry between several layers of paper towels.

In a bowl with an immersion blender, or in a food processor, puree the hot cauliflower with the cream cheese, Parmesan, garlic, chicken base, and pepper until almost smooth.

Garnish with chives, and serve hot with spray butter.

Hint: Try roasting the garlic and adding a little fresh rosemary for a whole new taste.

Chef: George Stella

Recipe courtesy George Stella

Read more at: http://www.foodnetwork.com/recipes/mock-garlic-mashed-potatoes-recipe.html?oc=linkback


Orange-Cranberry Sauce
 

Ingredients
3/4 c sugar 
2 oranges, zest and fruit, discard pith and membrane 
2 c cranberries, fresh or frozen 
1/4 t cinnamon, ground 
pinch cloves, ground

Directions 
Remove the zest from the two oranges using a zester or a small knife. 
Place the zest, sugar, and 3/4 cup of water into a saucepan. 
Bring to a simmer and cook for 5 minutes. 
Add cranberries and continue to cook until the cranberries start to pop, about 2 minutes. 
Add the oranges and spices to the mixture. 
Stir until mixture is combined. 
Serve hot or cold. 

Tip
If you like you cranberry sauce more like jelly, transfer entire mixture to the bowl of a food processor.   
Great on oatmeal, Greek yogurt, spread on your turkey sandwich 
Fat free chicken dinner by placing in crock-pot with chicken, Lipton onion soup mix, & fat free Catalina dressing and cook till tender.


Roasted Squash Soup 
Studies have shown that starting a meal with a broth-based soup can fill you up, so you eat fewer calories over the course of a meal. This soup gets a boost of flavor from cilantro pesto, but there's very little fat in this version. TIP: Roast the squash ahead of time and freeze it. Your oven will be full on Thanksgiving, and this will save you some valuable time.

Ingredients 
Soup 
1 T olive oil 
1 c onions, chopped fine 
1 large butternut squash, approx. 3 lbs 
4 c low sodium chicken stock  
1 orange 
1/2 c orange juice
Garnish 
1/2 bunch cilantro, fresh, leaf only
1/4 c unsweetened coconut, flake 
1 orange (zest, juice, and fruit) 
1 Serrano chili pepper
Directions 
Preheat oven to 375 degrees. Peel, halve, and remove the seeds from the squash. Dice into 3/4 inch cubes. Spray a roasting pan with nonstick cooking spray, add cubed squash, and spray the top of the squash. Roast 20-25 minutes or until squash is tender. Remove from oven. Place oil in a dutch oven or medium size saucepan. Sauté the onion in the oil over moderately low heat, stirring, until it is softened. Add the squash and stock; cook the mixture, covered, over moderately low heat for 10 minutes. Add the orange zest and the juice; simmer the mixture, uncovered, for 10 minutes. Using a blender or food processor, purée the mixture in batches. (For a smoother texture, strain the soup through a sieve, but you'll remove some of the fiber.) In a blender or food processor, blend the coconut, hot pepper, cilantro, orange juice and flesh until mixture forms a puree. If mixture is too thick, add warm water to thin it. Ladle the soup into soup cups and garnish each serving with about a teaspoon of the pesto.
Makes 8 one cup servings.
     

Tuesday, October 14, 2014

Training for the Run - Tie Your Shoes

How to Properly Tie Your Running Shoes

Here are five ways to lace your running shoes and relieve that nagging foot pain.


You went to a running specialty store, tested out several models, and bought a pair that felt great. So why are your new running shoes rubbing you the wrong way? Even if you are fitted with a pair that suits your arch type and weekly mileage, your feet may have characteristics that make the seemingly perfect shoe less than comfortable over the long haul. Luckily, the solution could be as easy as relacing your shoes, says Richard Bouché, D.P.M., of the Sports Medicine Clinic in Seattle, who provided the techniques below. "Before you get a new shoe, try adjusting the lacing to enhance the fit," Bouché says. "It's a small change that can make a big difference."


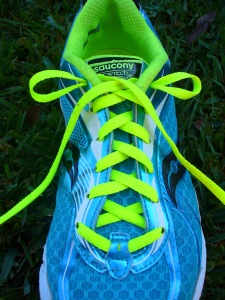
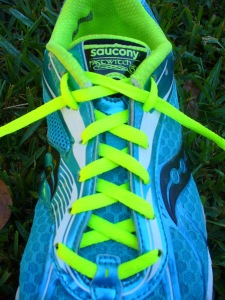
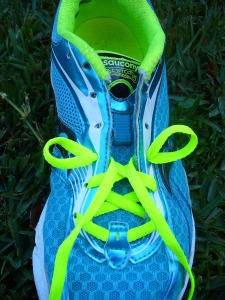
First, let’s cover the LOOP LACING LOCK. This technique can be used in a number of different lacing patterns to insure a tight and snug fit anywhere along the eye row of your shoe, depending on where your laces seem to be slipping.
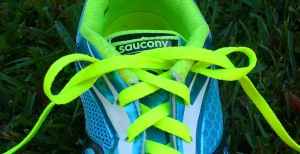
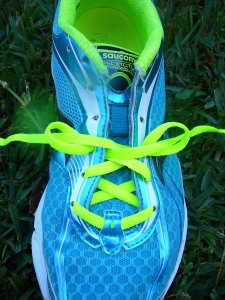
In this example, I have put the loop lacing lock at the top of the shoe. The shoe was cross-laced as usual to the top of the shoe. To accomplish the loop lacing lock, put each lace end back into the same hole it just exited, leaving a small loop on each side.


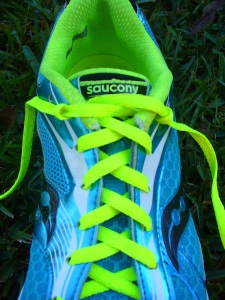
 Then thread each loose end through the loop on the opposite side of the shoe.

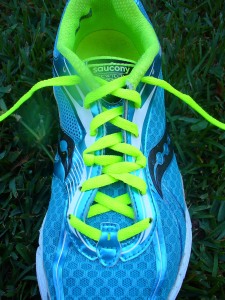
 Pull tight to make loops smaller. Then tie shoe as usual.


PROBLEM: My big toenail turns black


Solution: 
Lift the upper material above your big toe up and off it.


Technique:
To accomplish this threading technique, start by threading one end of the shoe lace through the eyelet at the top of the shoe on the opposite side of your big toe. Leave enough lace length to tie the shoe. Lace the rest of the shoe lace through the eyelet closest to your big toe, creating a diagonal lace down the length of the shoe. Lace this long length of shoe lace straight across toward the outside of the shoe and then diagonally up toward the inside of the shoe. Repeat this lacing pattern until the shoe is laced to the top. Tie the shoe, as usual. Lacing the shoe this way allows the material above your big toe to be pulled up and off of the nail when the outside lace is tugged and tied tightly.


PROBLEM: My shoe is too tight along the top of my foot
 
Solution: 
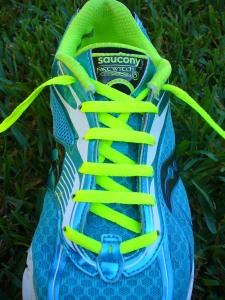
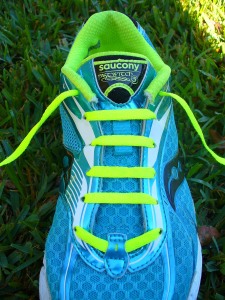
Use parallel lacing to secure your foot without putting pressure on the top.

Technique:
To give your shoe an overall roomier feel, try the parallel lacing technique. To start, lace the first tow eyelets near the toe of the shoe. On one side, pull the lace up through the first eyelet and then straight across the shoe and into the eyelet directly across from it. On the other side, skip the first eyelet and pull the lace up through the second eyelet and then lace it into the eyelet straight across from it. Repeat this skipping an eyelet and lacing across pattern until the shoe is laced to the top. 


PROBLEM: My heel slips up and down

 
Solution: 
Create a more secure fit around the ankle without tightening the entire shoe.

Technique: 
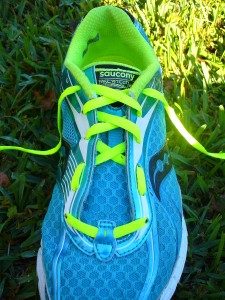
Lace as normal until one eyelet remains on each side. Draw the lace straight up on the outside of the shoe and bring it through the last eyelet. This will create a loop. Repeat on the other side. Cross each lace over the tongue, thread it through the opposite loop, and tie. The loops help to cinch in the material around your ankle to prevent your heel from slipping without making the rest of your shoe any tighter.


 PROBLEM: High Instep

 Technique:
Near the toe of the shoe, start lacing with the cross-lacing technique. Once you get to the middle of the shoe, thread the laces up the sides of the eye row, leaving room. Continue cross-lacing at the top of the shoe and tie at the top as usual. This will give your foot room in the midfoot area and help keep the shoe from feeling to tight across the arch of the foot.


PROBLEM: Wide Forefoot


 Technique:
From the bottom of the eye row, lace up the sides of the shoe. Once you get to the middle of the shoe (midfoot), start the cross-lacing technique and continue on to the top of the shoe. Tie shoe at the top, as usual. This will give your foot plenty of room to spread or allow your toes to splay while running.


PROBLEM: Narrow Foot


  Technique:
To help a shoe fit more snugly on a narrow foot, you might want to try adding a loop lacing lock in the middle of the eye row. To accomplish this, cross-lace the shoe as normal up to the midfoot, add a loop lacing lock, and then continue cross-lacing the shoe to the top. Tie the shoe at the top, as usual. Doing this will double the amount of laces across your midfoot, ensuring a snug fit.


PROBLEM: Heel Slipping


Technique:
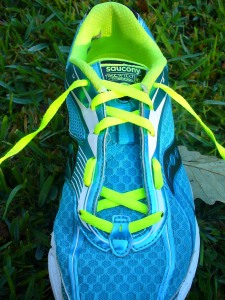
There are two good ways of keeping a shoe from slipping on the heel. The first way is to put a loop lacing lock at the top of the shoe (shown in the beginning of the post) and tie shoe as usual. Another way is to use a modified loop lacing lock, called a “runner’s tie.” To accomplish the runner’s tie, cross-lace the shoe until the second to last top hole and then lace up each side of the eye row. Take each loose lace end and thread it back under the side lace of the opposite side. Tie the shoe at the top, as usual.


PROBLEM: "MY SHOE RUBS ONE SPOT ON THE TOP OF MY FOOT." Solution: Eliminate pressure on a "hot spot" by lacing around it, not directly over it.

Technique:
Place a lipstick smear on your hot spot. Slide your bare foot into your shoe and take it out. The mark on the underside of the tongue tells you which set(s) of eyelets to skip. Lace your shoe until you reach the eyelet before the spot. Take the lace back under and pull it up through the next eyelet on the same side. Take the lace across and continue to lace. Repeat this on the other side. You'll have an empty spot on the tongue where no laces cross it, which should eliminate your pressure point.

Wednesday, October 1, 2014

30 Day Plank Challenge


Take up this 30 day plank challenge this month and tone up and boost your core muscles to the max.
The plank challenge is our most popular 30 day fitness challenge and has been taken by over 100,000 people over the past 12 months, so why not give it ago for yourself.
The challenge only has 1 exercise which you have to do each day, and the time spent doing the exercise slowly increases day by day to help you build up your core body muscle strength gradually, ensuring you are able to complete the final day of the challenge easily.


You only have to do the amount of time shown on the challenge chart once per day, however if you are feeling brave then you can repeat each days challenge as many times as you like – however remember by day 30 it will be very hard to do multiple times.

for more on the 30 DAY FITNESS CHALLENGES

Monday, September 22, 2014

Training for the Run - Yoga for Runners


8 Yoga Poses for Runners

Now that the scorching heat of the Las Vegas summer is winding down,  our race season is just heating up.  
At the request of many of our clients, I will be posting up regular tips for training.  


If you are a runner, you are probably familiar with the aches and pains in the back, knees, legs, ankles, and hips that can sometime creep up on you during or after a run—or even as a result of consistent running sessions throughout an extended period of time.
Running and yoga are not generally thought of, by most, to be included under the same umbrella. However, the benefits of yoga, including increased flexibility, muscle strength, improved bone density, circulation and breathing, and plenty more, can be so beneficial for runners and running that you may never want to lose sight of this age old regenerative practice again.
Here are 8 yoga poses for runners that can help to improve your runs as well as improve your recovery post session.


1. Downward Dog (Adho Mukha Svanasana) Ask anyone, yogi or not, to name a yoga pose and most likely they will mention Downward Dog. This is an excellent pose to check-in with your entire body because it stretches your arms, back and legs through one pose. Through this pose, you can get a general feeling for what areas are tighter than others and what you should focus more on. While doing this pose, and driving your heels toward the Earth, you can really open up the hamstrings and calves, stretch the feet and the achilles, which is excellent for runners. On top of that, this pose is regenerative and improves circulation throughout the body as the head is below the heart.


2. Triangle Pose (Trikonasana) Triangle will stretch the hips, groins, hamstrings, the muscles surrounding the knee, calves, ankle joints, shoulders, chest, and spine. It also strengthens the abdominal muscles, obliques, back, legs, knees, and ankles. This pose includes a light spine strengthening twist. This pose is great for runners because it helps to open the groins and hamstrings and improves balance by strengthening and stretching the ankles.


3. Standing Forward Fold (Uttanasana) Standing forward fold is a great opener for the hamstrings, calves, and hips and it helps to strengthen the knees and quadriceps. Having lose and flexible hamstrings is important for everyone because tight hamstrings can lead to back pain and tension which can then transfer to problems with the knees and hips.


4. Tree (Vrksasana) Tree pose requires strength, flexibility, and balance while strengthening the ankles, calves, thighs, and the spine while opening the hips and stretching the shoulders, chest, groins, and inner thighs. Tree pose can also relieve sciatic pain and reduce flat feet.


5. Reclining Pigeon (Sucirandhrasana) Reclining pigeon, a gentler modification of Pigeon pose, is excellent for tight hips. This pose is also great for stretching the IT band, the connective tissue that runs along your outer thigh from your hip to your shin. This pose can also be preventative for knee problems because a tight IT Band could eventually lead to issues with the knee. This is a great pose you can do at the end of any run.


6. Cobbler or Butterfly (Baddha Konasana) Cobbler’s pose is a great stretch for runners because it opens the groins, inner thighs, and knees, and boosts mobility in the hips. Cobbler helps to release tense areas in the hips and groins while strengthening the muscles of the back


7. Child’s Pose (Balasana) Child’s pose is a gentle, comforting stretch and resting pose. It stretches the hips, thighs, knees, ankles, and low back. It releases back and neck strain and aids blood flow to the spine and brain. For runners and other athletes, child’s pose helps keep the ankles supple and flexible, while stretching the tops of the feet and the shins, which may help to avoid shin splints. Child’s pose also gently increases flexibility in the knee joint and opens the hips and thighs.  If you have ever taken a yoga class, the instructor most likely reminds you to come to this pose at any time throughout the practice if you need a physical or mental break.


8. Low Lunge (Anjaneyasana) Low lunge is an excellent hip opener and also stretches the thighs and groin. It is very common for runners to have tight hips, which can lead to underactive gluteal muscles, thus resulting in potential low back and/or knee problems. This pose requires mental focus and can be performed with your front toe up against a wall in order to promote balance and stabilization. You can also use the wall to walk your hands up until you feel stable enough to extend them overhead.


re-blogged from hello healthy by myfitnesspal


Monday, September 15, 2014

28-Day Squat Challenge

re-blogged from myfitnesspal


I’m a huge fan of body-weight exercises for the reason that you can use them for a great workout anywhere. And perhaps the king of all body-weight exercises is the squat. Squats are awesome because they provide a great workout for multiple muscle groups, including the butt, thighs, and core.  It’s for that reason that 30-day squat challenges have become increasingly popular over the past year. There are hundreds of variations available online, but generally they all involve squatting almost every day for a month, starting at 50 reps on your first day and finishing at 250 on your last.
As much as I love anything that gets people moving, particularly squatting, that kind of challenge simply won’t help you reach your goals. 50 squats in one day is too difficult for most beginners, and even if you could do 250 squats with perfect form, you will be training for muscular endurance rather than strength (which is what leads to the toned look). It’s the same reason you wouldn’t do 50+ reps of an exercise in the gym.
Instead, the focus should be on fewer, quality reps that get tougher over time (like using heavier weights in the gym). I decided to use this principle to create a different kind of squat challenge that will give you the best possible chance of safely getting a toned butt and thighs, along with improving your technique.
Here’s how it works:
  • You will do a different squat variation each week for a month. The variations get more difficult as the month progresses.
  • Each day has a target number or reps for which you should aim. You can do them all in one go or spread them out throughout the day.
  • If you fail to reach the target number of reps with perfect form you must go back to the beginning of that 7 day period.
  • You may not have heard of each variation, so how to do them properly is explained below.


Counterbalance Box Squat:
  • With your feet shoulder width apart, keep your chest up and arms out in front of you as a counterbalance.
  • Sit back and down onto a surface, such as a chair or stool. Let your butt touch the surface, but don’t sit down.
  • As you descend make sure your knees are tracking over your toes.
  • Return to the starting position by pushing through your heels and squeezing your glutes.
Prisoner Box Squat:
  • Keeping the tips from above in mind, place your hands behind your head rather than out in front of you.
  • Use a lower chair or stool than before to make sure you are squatting deeper.
  • Over the course of the week keep lowering the surface until your thighs are parallel (or lower) to the ground when in the bottom position.
Counterbalance Air Squat:
  • Remove the chair or stool and put your arms out in front of you.
  • Squat down as before, ensuring that your thighs are parallel to the ground (or lower). The deeper you squat the more muscles you activate.
  • Remember to keep your torso as upright as possible by keeping your chest up.
Prisoner Air Squat:
  • Put your hands behind your head once again and continue squatting as low as you can.
  • Remember: chest up, feet shoulder width apart, knees tracking over toes, sit back, and push through your heels.
  • By the end of the month, you should be able to do a basic body-weight squat with great form.
So what are you waiting for? Take on the challenge and share it with your friends! We can’t wait to see your results!

Monday, June 30, 2014

Menopause


The verdict is in – extra pounds equal more hot flashes and night sweats.
These foods are proven fat fighters that will help you reduce your waist line and ultimately your quality of life when going through menopause.


1)   Baby Spinach – at only 7 calories a cup you can have a huge fulfilling salad

2)  Grapefruit – eating ½ grapefruit before each meal is a delicious way to help burn fat thanks to the compound naringenin

3)   Nonfat ricotta – made from whey protein – it can enhance muscle building and metabolism

4)   Bell peppers – packed with Vitamin C – just one bell pepper gives you 200% of your daily dose

5)   Romaine Lettuce – fill up on this leafy green that gives you your daily dose of Vitamin K and you can trim the number of calories you eat by 10% at each meal

6)   Nuts – walnuts and almonds are the perfect combination or healthy fat, protein, and fiber. Make your own 100 calorie snack packs to help you slim down

7)   Salmon – canned is fine and you get a whopping 17grams of protein for a 3oz serving

8)   Edamame – snack on these perfect pods to keep you full and satisfied all day

9)   Chili powder – capsinoids burn belly fat – so fire up that vegetarian chili for a fat fighting feast

10) Dark chocolate – Thank Heaven! Just a small piece can satisfy your craving helping you to eat less of the unhealthy processed foods with high-fructose corn syrup.


11) Coconut oil – contains medium chain triglycerides that boost your metabolism and tastes great too!