How to Properly Tie Your Running Shoes
Here are five ways to lace your running shoes and relieve that nagging foot pain.

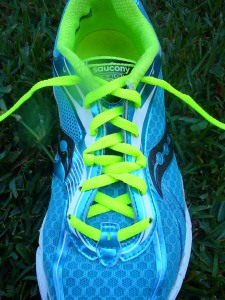
You went to a running specialty store, tested out several models, and bought a pair that felt great. So why are your new running shoes rubbing you the wrong way? Even if you are fitted with a pair that suits your arch type and weekly mileage, your feet may have characteristics that make the seemingly perfect shoe less than comfortable over the long haul. Luckily, the solution could be as easy as relacing your shoes, says Richard Bouché, D.P.M., of the Sports Medicine Clinic in Seattle, who provided the techniques below. "Before you get a new shoe, try adjusting the lacing to enhance the fit," Bouché says. "It's a small change that can make a big difference."
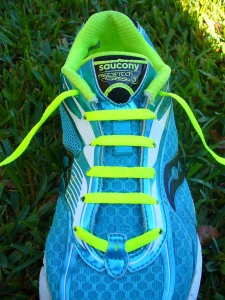
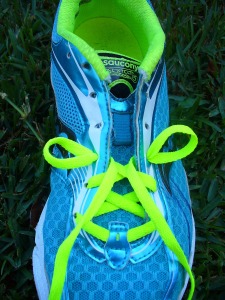
First, let’s cover the LOOP LACING LOCK. This technique can be used in a number of different lacing patterns to insure a tight and snug fit anywhere along the eye row of your shoe, depending on where your laces seem to be slipping.
In this example, I have put the loop lacing lock at the top of the shoe. The shoe was cross-laced as usual to the top of the shoe. To accomplish the loop lacing lock, put each lace end back into the same hole it just exited, leaving a small loop on each side.
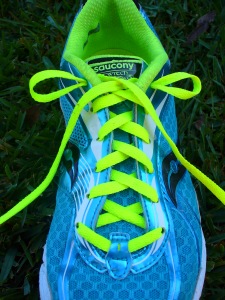
Then thread each loose end through the loop on the opposite side of the shoe.
PROBLEM: My big toenail turns black
Solution:
Lift the upper material above your big toe up and off it.
Solution:
Lift the upper material above your big toe up and off it.
Technique:
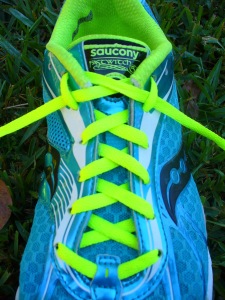
To accomplish this threading technique, start by threading one end of the shoe lace through the eyelet at the top of the shoe on the opposite side of your big toe. Leave enough lace length to tie the shoe. Lace the rest of the shoe lace through the eyelet closest to your big toe, creating a diagonal lace down the length of the shoe. Lace this long length of shoe lace straight across toward the outside of the shoe and then diagonally up toward the inside of the shoe. Repeat this lacing pattern until the shoe is laced to the top. Tie the shoe, as usual. Lacing the shoe this way allows the material above your big toe to be pulled up and off of the nail when the outside lace is tugged and tied tightly.
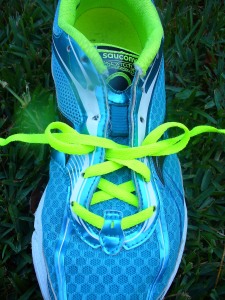
PROBLEM: My shoe is too tight along the top of my foot
Solution:
Use parallel lacing to secure your foot without putting pressure on the top.
Solution:
Use parallel lacing to secure your foot without putting pressure on the top.
Technique:
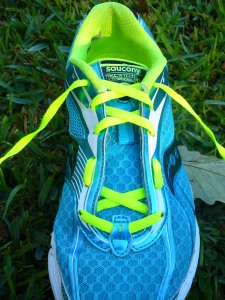
To give your shoe an overall roomier feel, try the parallel lacing technique. To start, lace the first tow eyelets near the toe of the shoe. On one side, pull the lace up through the first eyelet and then straight across the shoe and into the eyelet directly across from it. On the other side, skip the first eyelet and pull the lace up through the second eyelet and then lace it into the eyelet straight across from it. Repeat this skipping an eyelet and lacing across pattern until the shoe is laced to the top.
PROBLEM: My heel slips up and down
Solution:
Create a more secure fit around the ankle without tightening the entire shoe.
Technique:
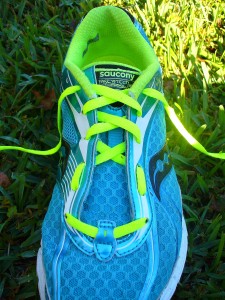
Lace as normal until one eyelet remains on each side. Draw the lace straight up on the outside of the shoe and bring it through the last eyelet. This will create a loop. Repeat on the other side. Cross each lace over the tongue, thread it through the opposite loop, and tie. The loops help to cinch in the material around your ankle to prevent your heel from slipping without making the rest of your shoe any tighter.
PROBLEM: High Instep
 Technique:
Near the toe of the shoe, start lacing with the cross-lacing technique. Once you get to the middle of the shoe, thread the laces up the sides of the eye row, leaving room. Continue cross-lacing at the top of the shoe and tie at the top as usual. This will give your foot room in the midfoot area and help keep the shoe from feeling to tight across the arch of the foot.
PROBLEM: Wide Forefoot
Technique:
From the bottom of the eye row, lace up the sides of the shoe. Once you get to the middle of the shoe (midfoot), start the cross-lacing technique and continue on to the top of the shoe. Tie shoe at the top, as usual. This will give your foot plenty of room to spread or allow your toes to splay while running.
PROBLEM: Narrow Foot
 Technique:
To help a shoe fit more snugly on a narrow foot, you might want to try adding a loop lacing lock in the middle of the eye row. To accomplish this, cross-lace the shoe as normal up to the midfoot, add a loop lacing lock, and then continue cross-lacing the shoe to the top. Tie the shoe at the top, as usual. Doing this will double the amount of laces across your midfoot, ensuring a snug fit.
PROBLEM: Heel Slipping
Technique:
There are two good ways of keeping a shoe from slipping on the heel. The first way is to put a loop lacing lock at the top of the shoe (shown in the beginning of the post) and tie shoe as usual. Another way is to use a modified loop lacing lock, called a “runner’s tie.” To accomplish the runner’s tie, cross-lace the shoe until the second to last top hole and then lace up each side of the eye row. Take each loose lace end and thread it back under the side lace of the opposite side. Tie the shoe at the top, as usual.
PROBLEM: "MY SHOE RUBS ONE SPOT ON THE TOP OF MY FOOT." Solution: Eliminate pressure on a "hot spot" by lacing around it, not directly over it.
Lace as normal until one eyelet remains on each side. Draw the lace straight up on the outside of the shoe and bring it through the last eyelet. This will create a loop. Repeat on the other side. Cross each lace over the tongue, thread it through the opposite loop, and tie. The loops help to cinch in the material around your ankle to prevent your heel from slipping without making the rest of your shoe any tighter.
PROBLEM: High Instep
Near the toe of the shoe, start lacing with the cross-lacing technique. Once you get to the middle of the shoe, thread the laces up the sides of the eye row, leaving room. Continue cross-lacing at the top of the shoe and tie at the top as usual. This will give your foot room in the midfoot area and help keep the shoe from feeling to tight across the arch of the foot.
PROBLEM: Wide Forefoot
Technique:
From the bottom of the eye row, lace up the sides of the shoe. Once you get to the middle of the shoe (midfoot), start the cross-lacing technique and continue on to the top of the shoe. Tie shoe at the top, as usual. This will give your foot plenty of room to spread or allow your toes to splay while running.
PROBLEM: Narrow Foot
To help a shoe fit more snugly on a narrow foot, you might want to try adding a loop lacing lock in the middle of the eye row. To accomplish this, cross-lace the shoe as normal up to the midfoot, add a loop lacing lock, and then continue cross-lacing the shoe to the top. Tie the shoe at the top, as usual. Doing this will double the amount of laces across your midfoot, ensuring a snug fit.
PROBLEM: Heel Slipping
Technique:
There are two good ways of keeping a shoe from slipping on the heel. The first way is to put a loop lacing lock at the top of the shoe (shown in the beginning of the post) and tie shoe as usual. Another way is to use a modified loop lacing lock, called a “runner’s tie.” To accomplish the runner’s tie, cross-lace the shoe until the second to last top hole and then lace up each side of the eye row. Take each loose lace end and thread it back under the side lace of the opposite side. Tie the shoe at the top, as usual.
PROBLEM: "MY SHOE RUBS ONE SPOT ON THE TOP OF MY FOOT." Solution: Eliminate pressure on a "hot spot" by lacing around it, not directly over it.
Technique:
Place a lipstick smear on your hot spot. Slide your bare foot into your shoe and take it out. The mark on the underside of the tongue tells you which set(s) of eyelets to skip. Lace your shoe until you reach the eyelet before the spot. Take the lace back under and pull it up through the next eyelet on the same side. Take the lace across and continue to lace. Repeat this on the other side. You'll have an empty spot on the tongue where no laces cross it, which should eliminate your pressure point.
Place a lipstick smear on your hot spot. Slide your bare foot into your shoe and take it out. The mark on the underside of the tongue tells you which set(s) of eyelets to skip. Lace your shoe until you reach the eyelet before the spot. Take the lace back under and pull it up through the next eyelet on the same side. Take the lace across and continue to lace. Repeat this on the other side. You'll have an empty spot on the tongue where no laces cross it, which should eliminate your pressure point.
No comments:
Post a Comment